
Dedication
I’d like to dedicate this post to future-me. May your next installation of Web Deploy take minutes, not hours…
First, I rant :)
It seems like every year or so I find myself having to install Web Deploy on yet another machine. In other words, I do it juuuuuuust infrequently enough that I can never exactly remember how I dealt with this perennial love note from Microsoft:
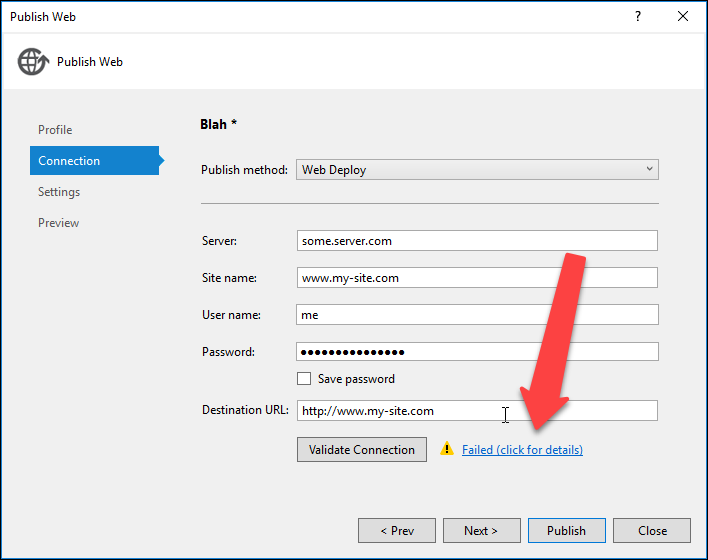
“Failed. Click for details.”
Why do you taunt me?
Why not just tell me what went wrong? Why hide the information behind door number 3? I can only guess that the designer of this dialog assumed installing web deploy would be so easy - so foolproof - that hardly anyone ever would need to see the gory details behind connection errors that might arise.
Well. Let me tell you, I’ve clicked that link more times that I care to recount. And what awaits us? A modal dialog with information you almost certainly will want to copy & paste or click:
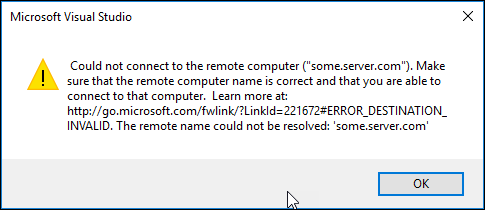
See? Right there, it says ‘for more information, go here’. It BEGS you to click it. But you can’t. The text is neither selectable nor clickable. If you only encounter a couple simple errors - a mistyped password, or the wrong server URL - fine, whatever, no big deal. If, on the other hand, it’s a more involved problem requiring a few dozen retries, I promise you’ll be lashing out at that dialog like Donald Trump at a press conference.
Ok, rant over
Installing Web Deploy isn’t always a pain in the ass. A few times it’s been pretty much just click-click-go. Most of the time, however, it hasn’t been quite that straight forward for me. Given that I’m pretty sure it’s the same set of stupid problem each time, it occurred to me that ‘next time’ I should take notes on these problems and how I fixed them.
‘Next time’ turned out to be two days ago. So, future me, here’s your official Suggested Web Deploy Installation Instructions:
1) Install Windows Updates
I jumped the gun the other day and installed the Web Platform Installer first and then the “Recommended Server Configuration for Web Hosting Providers”, but the latter item(s) failed to completely install until I installed several rounds of Windows Updates. So! First step: Install Windows Updates.
2) Install IIS
Unfortunately I didn’t take many notes on this one and, rather late in my journey, I found that I had missed a vital checkbox in the Add/Remove Windows Features dialog. Best I can say is google a tutorial for installing IIS and make sure you enable ASP.NET 4.5 (or whatever version) under Internet Information Services > World Wide Web Services > Application Development Features. I got that tip here while googling this error message: Handler "ExtensionlessUrlHandler-Integrated-4.0" has a bad module "ManagedPipelineHandler" in its module list.
3) Install Web Platform Installer
Ok, now you can install the Web Platform Installer. At the time of this writing, the current version is 5.
4) Install ‘Recommended Server Configuration for Web Hosting Providers’
Launch the Web Platform Installer, and search for “Recommended Server Configuration for Web Hosting Providers”, and install it.
5) Install Management Service
This here is the critical gotcha. You MUST install Management Service BEFORE you install Web Deploy. Check out this comment from this StackOverflow answer:
…I installed Web Deploy BEFORE installing the management service. I tried to do a “change” on the install to include the management service (or you can add the feature from add/remove windows features), but that didn’t help (got the error on this post). In the end a simple uninstall and reinstall of 3.6 was what worked for me. Seems it needs the Web Management Service to be installed FIRST. Typical MS instructions don’t even mention this at all.
I had the same experience. Save yourself some trouble and before you do anything else, go to Add/Remove Windows Features > Web Server (IIS) > Management Tools > Management Service and install it.
6) Install Web Deploy
This can be installed via the Web Platform installer, but I downloaded the version 3.6 stand-alone installer and ran it directly. No idea if that effected my outcome or not. Here’s the thing. At some point after I installed Web Deploy, while troubleshooting connection issues from the aforementioned Visual Studio “publish” dialog, I found this StackOverflow answer which brought something VERY interesting to my attention:
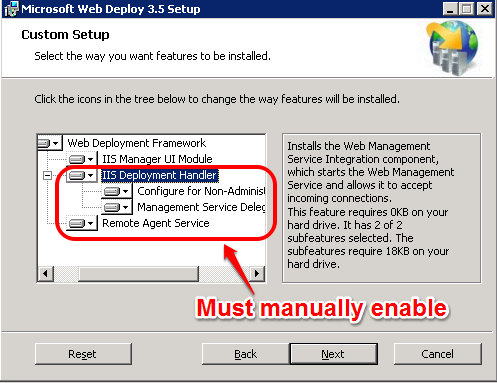
That’s right! Apparently the FULL install option doesn’t actually mean FULL.
Now, in my case, it’s entirely possible that the reason I didn’t get a truly full installation is because I hadn’t installed Management Service yet. However, I would still highly recommend that you do not select “Full Install” while installing Web Deploy. Instead, select “Custom”, and make damn sure all the components are selected for installation.
Publish! (Or not…)
Now, make the sign of the cross, click your heals together three times, cross your fingers, or do whatever else you do for good luck, and click that “Validate Connection” button again.
Did it work??
If so, great!
If not, I’ve failed you. All I can do is leave you with this post called Installing and Configuring Web Deploy on IIS 8.0 or Later and hope you find some bit of information I forgot to note. If you find anything I should add to this article, please add a comment!