
During my initial foray into VSTO office development two years ago, I was particularly frustrated by the severe lack of documentation on the subject. Unfortunately, it seems this is still something of a problem. It took me hours of googling the other day just to find a definitive list of all the ribbon callback signatures. I know I wasn’t the only one having this problem because I found a month-old unanswered question on StackOverflow asking for the same information. (I posted a response after I found the list linked above.) And all I was trying to do was answer another question that should have been pretty easy: how can you configure an Excel workbook to disable a native ribbon command on a per-worksheet basis? The answer wasn’t as obvious as I thought, so I decided to post my solution here. For kicks, I did the same thing with VBA and it proved to be much simpler. You can download the VSTO solution here and the VBA solution here1.
Before I dive into the nitty gritty, there are a couple essential resources I found for tackling problems like this. First is a Microsoft tutorial video that shows how to alter the functionality of a native Outlook command using VB. The image quality isn’t as high as I’d like, but it’s still very informative. Although I’ll be using Excel instead of Outlook and C# instead of VB, the general process is very similar. The other resource is the collection of MS Office Control IDs. If you already watched that video, yes, these are the same control IDs mentioned in the video. Included are all the names and other properties for all the ribbon controls for Access, Excel, PowerPoint, Word, and Outlook.
Okay, on with the show. For the VSTO solution, I created a new Excel workbook project and renamed Sheet1 to MagicSheet. That’s the one I don’t want to be deleted. Ever. (It’s magic.) Next I added a new Ribbon XML class to the project. Not a Visual Designer; just the XML. I changed the name to Ribbon—instead of the default Ribbon1—just because I’m only planning on having one, so why not. I then changed its XML to look like this:
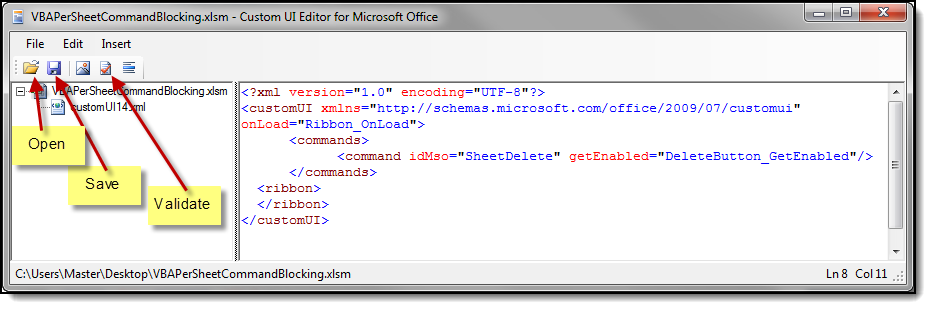
<?xml version="1.0" encoding="UTF-8"?>
<customUI xmlns="http://schemas.microsoft.com/office/2009/07/customui" onLoad="Ribbon_Load">
	<commands>
		<command idMso="SheetDelete" getEnabled="DeleteButton_GetEnabled"/>
	</commands>
  <ribbon>
  </ribbon>
</customUI>
(All the stuff in the default ‘tabs’ element can be deleted.) How did I know to use SheetDelete for the idMso? It’s listed in that Control IDs file I mentioned earlier. The string in getEnabled is the callback that—you guessed it!—checks whether or not that command should be enabled. The callback itself goes in the Ribbon.cs file, ideally in the pre-designated Ribbon Callbacks region. (VSTO creates that region by default.) The callback signature can be found in the list linked above, and the code I used is this:
public bool DeleteButton_GetEnabled(IRibbonControl control)
{
	return Globals.ThisWorkbook.CanDeleteSheet;
}
That CanDeleteSheet property doesn’t exist yet, but we’re getting there. Make damn sure your callback method is spelled exactly as you specified in the getEnabled attribute; otherwise it won’t work. And, no, you will not get an error message if you screw up. So much for strong typing, eh? Since we’re already editing the Ribbon.cs file, we can add this method as well:
public void InvalidateBuiltinControl(string controlID)
{
	this.ribbon.InvalidateControlMso(controlID);
}
More on that soon. Onward to the ThisWorkbook class! When you add a Ribbon to your project, VSTO instructs you to override the CreateRibbonExtensibilityObject() method in ThisWorkbook and provides you the exact method you should use. It’s just copy and paste. But we’re gonna tweek it a bit:
Ribbon ribbon;
protected override IRibbonExtensibility CreateRibbonExtensibilityObject()
{
	this.ribbon = new Ribbon();
	return this.ribbon;
}
The difference is simply that we’re keeping a local reference to that Ribbon object. Why? So that we can call InvalidateBuiltinControl() against it. I’m honestly still not sure if this is the best way to maintain a reference to the ribbon, but it’s the only way I could find that satisfied my delicate coding sensibilities. Ideally, you’d think there would be a static reference in the Globals class, like there is for ThisWorkbook. However, that’s not the case. C’est la vie. Next, we add a property that should look familiar:
public bool CanDeleteSheet { get; private set; }
And finally, we tweek the ThisWorkbook_Startup method like so:
private void ThisWorkbook_Startup(object sender, System.EventArgs e)
{
	Globals.MagicSheet.ActivateEvent += () =>
		{
			this.CanDeleteSheet = false;
			this.ribbon.InvalidateBuiltinControl("SheetDelete");
		};

	Globals.MagicSheet.Deactivate += () =>
		{
			this.CanDeleteSheet = true;
			this.ribbon.InvalidateBuiltinControl("SheetDelete");
		};
}
Are you putting it all together? When my MagicSheet is activated, the CanDeleteSheet property is set to false and we invalidate the current state of the sheet delete buttons, forcing the ribbon to call its getEnabled callback. The callback, of course, returns false because it just gets the value of CanDeleteSheet. Note that disabling the SheetDelete command not only disables the Ribbon delete button, but also the delete button that comes up when you right-click the sheet tab. When MagicSheet is deactivated, the process repeats, except this time CanDeleteSheet is true and the delete buttons will be enabled. Pretty simple, right? Well, my first attempt failed because I tried to apply my old VBA tricks which, unfortunately, didn’t directly translate.
If you do the same thing with VBA, the hardest part is editing the ribbon. Visual Studio does a little work for you behind the scenes, which wires up your custom ribbon XML. You can do it manually, but I wouldn’t recommend it. If anyone reeeeeally wants to know, ask me in the comments and I’ll think about adding it. ;) Or you can just google it. Anyway, to do this the easy way, you’ll need the Office Custom UI Editor. (It’s free.) Once you’ve got it running, open it up and then use it to open your workbook and paste the XML I listed above into the window. Click Validate to ensure it’s correct (it is), then save.
After that, it’s pretty must wham-bam thank you ma’am. To continue following my example, change the CodeName property for one of your sheet modules to MagicSheet. The what property? The CodeName property. Select a sheet module, press F4, and edit the (Name) property.
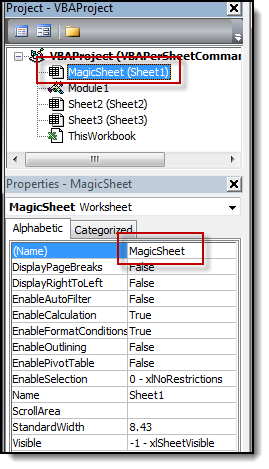
Unlike the sheet name which can be easily changed by a user, the sheet’s CodeName can only be changed in the manner just described. It’s read-only when called from code. Very handy for VBA development purposes. But beware, as far as I can tell, CodeName is completely useless in VSTO projects because there does not seem to be any way to change its value. And believe me, I tried! So Sheet1 is Sheet1 forever.
Next, dump this is a standard module:
Public CustomRibbon As IRibbonUI

Sub DeleteButton_GetEnabled(Control As IRibbonControl, ByRef returnedVal)

If ThisWorkbook.ActiveSheet.CodeName = "MagicSheet" Then

    returnedVal = False

Else

    returnedVal = True

End If

End Sub

Sub Ribbon_OnLoad(ribbon As IRibbonUI)

Set CustomRibbon = ribbon

End Sub
And this goes in the ThisWorkbook module:
Private Sub Workbook_SheetActivate(ByVal Sh As Object)

CustomRibbon.InvalidateControlMso "SheetDelete"

End Sub
That’s it. I suppose you could use the CodeName tactic in VSTO, as long as you’re okay with the name Sheet1 or Sheet66 or whatever:
public bool CanDeleteActiveSheet()
{
	return ((Excel.Worksheet)this.ActiveSheet).CodeName != "Sheet1";
}
But I found that annoyingly sloppy. Anyway, if you’ve got any questions, let me know. :-)
Note 10/30/2020: I cannot imagine that anyone will ever look at this post ever again, but if you’re reading this, you just proved me wrong. I deleted the referenced zip files because 1) downloading zip files is dangerous these days and 2) no one could possibly need or want those files. Sorry! ↩︎